

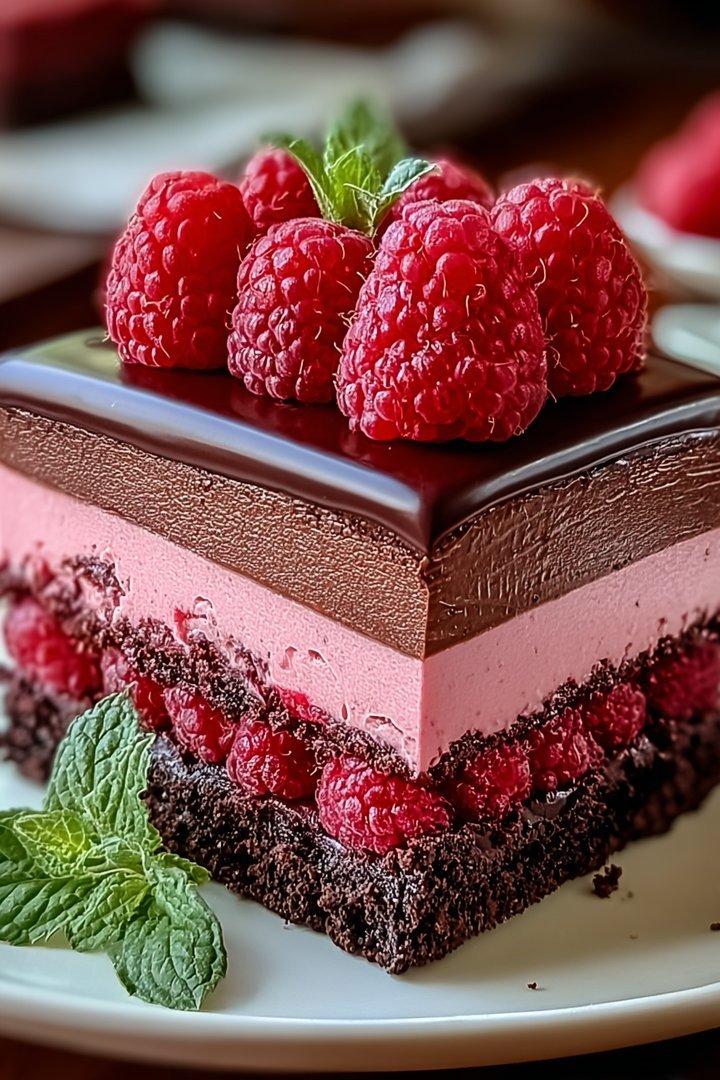
Imagine sinking your fork into a cloud of decadence, where the rich, dark allure of chocolate dances with the tangy sweetness of raspberries. That, my friends, is the **Heavenly Raspberry Chocolate Mousse Cake**, a dessert that’s guaranteed to make your taste buds sing.
This isn’t just cake; it’s an experience, a symphony of textures and flavors that will leave you craving more. Get ready to embark on a baking adventure that ends with a slice of pure bliss!
Why You’ll Adore This Heavenly Raspberry Chocolate Mousse Cake:
- It combines the intense richness of dark chocolate mousse with the bright, fruity tang of fresh raspberries, creating a perfectly balanced dessert.
- Despite its impressive appearance, this cake is surprisingly easy to make, even for beginner bakers, with clear, step-by-step instructions.
- The stunning layers of chocolate and raspberry make it a show-stopping centerpiece, perfect for birthdays, anniversaries, or any special occasion.
- This cake is incredibly versatile; you can customize it with different berries or chocolate types to suit your preferences and create your signature dessert.
Ingredients for Heavenly Raspberry Chocolate Mousse Cake
Here’s what you’ll need to make this delicious dish:
The full ingredients list, including measurements, is provided in the recipe card directly below.
How to Make Heavenly Raspberry Chocolate Mousse Cake
Follow these simple steps to prepare this delicious dish:
Step 1: **Prepare the Chocolate Cake Base**
Preheat your oven to 350°F (175°C). Grease and flour a 9-inch round cake pan. In a bowl, cream together the butter and sugar until light and fluffy. Beat in the eggs one at a time, then gradually add the flour and cocoa powder until just combined. Pour the batter into the prepared pan and bake for 25-30 minutes, or until a toothpick inserted into the center comes out clean. Let the cake cool completely before proceeding.
Step 2: **Make the Raspberry Layer**
In a saucepan, combine the fresh raspberries, a bit of sugar (adjust to your taste), lemon juice, and agar-agar powder. Bring the mixture to a boil, then reduce the heat and simmer for about 5 minutes, stirring constantly, until the raspberries break down and the mixture thickens slightly. Let it cool slightly, then pour over the cooled chocolate cake base. Refrigerate for at least 30 minutes to allow the raspberry layer to set.
Step 3: **Prepare the Chocolate Mousse**
Melt the dark chocolate in a double boiler or microwave, stirring until smooth. In a separate bowl, whisk egg yolks with sugar until pale and thickened. Gradually pour the melted chocolate into the egg yolk mixture, whisking constantly until well combined.
Step 4: **Whip the Cream and Combine**
In a large bowl, whip the heavy cream until stiff peaks form. Gently fold the whipped cream into the chocolate mixture until just combined, being careful not to deflate the cream.
Step 5: **Assemble the Cake**
Pour the chocolate mousse over the set raspberry layer. Spread evenly and refrigerate for at least 4 hours, or preferably overnight, to allow the mousse to fully set.
Step 6: **Serve and Enjoy**
Before serving, decorate the cake with fresh raspberries, chocolate shavings, or a dusting of cocoa powder. Slice and serve chilled. This Heavenly Raspberry Chocolate Mousse Cake is perfect for impressing your guests or indulging in a special treat.
Perfecting the Cooking Process
For a truly divine experience with this Heavenly Raspberry Chocolate Mousse Cake, start with the mousse. Allow ample chilling time for each layer to set properly before adding the next. This prevents a messy, albeit delicious, landslide of chocolatey goodness!
Add Your Touch
Feel free to experiment with different extracts. A hint of almond or even a touch of orange zest can wonderfully complement the raspberry and chocolate. For an extra layer of decadence, swirl in a raspberry puree into the chocolate mousse.
Storing & Reheating
This Heavenly Raspberry Chocolate Mousse Cake is best stored in the refrigerator. Cover it tightly to prevent it from absorbing any unwanted fridge odors. It’s generally best enjoyed within 2-3 days for optimal freshness and flavor.
Tips for a Heavenly Cake
- Gently fold the whipped cream into the chocolate mixture to keep the mousse light and airy, like a cloud made of cocoa dreams.
- Don’t skip the chilling time for the mousse! It’s crucial for the texture and prevents the layers from becoming a melty mess.
- Use high-quality chocolate for the best flavor. The better the chocolate, the more intense and satisfying the final result.
(Personal anecdote formated as paragraph subheading)
My cousin, bless her heart, once tried to rush the chilling process by putting it in the freezer. It became a chocolate-raspberry brick! We still ate it, of course, but lesson learned: patience is a virtue, especially with mousse!
Let’s Talk Mousse, Baby!
Okay, friends, let’s dive into the world of Heavenly Raspberry Chocolate Mousse Cake. Forget those sad, dry cakes that haunt potlucks. We’re talking about a symphony of textures and flavors that will make your taste buds sing opera. Imagine: layers of rich, decadent chocolate mousse dancing with the bright, tart kiss of fresh raspberries. Are you drooling yet? Because I am!
But before you run screaming for the nearest bakery, let me assure you: this masterpiece is totally doable at home. Yes, even if your baking skills are currently limited to microwaving popcorn. We’re going to break it down, step-by-step, with plenty of laughs and minimal kitchen disasters. Trust me, if I can do it (and I once set fire to water), you can absolutely conquer this Heavenly Raspberry Chocolate Mousse Cake.
The Players: Assembling Your Team of Ingredients
Think of your ingredients as characters in a delicious play. Each one has a vital role, and together, they create something truly spectacular. Here’s the cast list for our Heavenly Raspberry Chocolate Mousse Cake:
- **For the Chocolate Mousse:** The stars of the show! We’re talking good quality dark chocolate (the higher the cocoa percentage, the richer the flavor), heavy cream (for that luxurious texture), eggs (to bind it all together), and a touch of sugar to sweeten the deal.
- **For the Raspberry Layer:** Our sassy supporting character! Fresh raspberries are a must for that burst of juicy tartness. A little sugar helps them release their natural juices, creating a vibrant puree.
- **For the Cake Base:** The solid foundation! You can use a store-bought sponge cake (no judgment here!), or bake your own. A simple chocolate cake is a perfect complement to the mousse.
- **The Extras:** These are the little details that elevate our cake to legendary status. Think chocolate shavings, fresh raspberries for garnish, or a dusting of cocoa powder.
Now, gather your troops! Make sure everything is fresh and ready to go. Remember, quality ingredients equal a quality dessert. Don’t skimp on the chocolate! Your taste buds will thank you.
Choosing Your Chocolate Wisely
Listen up, chocolate aficionados! This is where things get serious. The type of chocolate you use will drastically impact the flavor of your Heavenly Raspberry Chocolate Mousse Cake. Aim for dark chocolate with a cocoa content of at least 60%. This will give you a deep, rich flavor that perfectly balances the sweetness of the raspberries.
Avoid using milk chocolate or baking chocolate chips. Milk chocolate can be too sweet and will overpower the raspberry flavor. Baking chocolate chips often contain stabilizers that can affect the texture of the mousse. Splurge on a good quality bar of dark chocolate – it’s worth it!
The Raspberry Revelation: Fresh vs. Frozen
Ah, the age-old debate: fresh or frozen raspberries? For this recipe, fresh raspberries are definitely the way to go. They have a brighter, more vibrant flavor and a better texture than frozen raspberries. Plus, they look absolutely stunning as a garnish!
If you absolutely can’t find fresh raspberries, frozen raspberries can be used in a pinch. Just be sure to thaw them completely and drain off any excess liquid before pureeing them. Keep in mind that frozen raspberries may not have the same intense flavor as fresh raspberries.
Let the Baking Games Begin! (But Not Really, We’re Making Mousse)
Alright, soldiers, let’s get this show on the road! We’re going to tackle this Heavenly Raspberry Chocolate Mousse Cake one layer at a time. Don’t panic, it’s easier than it looks. Just follow my lead and we’ll have a dessert fit for royalty in no time.
Step 1: Conquering the Chocolate Mousse
1. **Melt the Chocolate: ** In a heatproof bowl set over a simmering pot of water (or in the microwave in 30-second intervals), melt the dark chocolate until smooth and glossy. Be careful not to burn it!
2. **Whip the Cream: ** In a separate bowl, whip the heavy cream until stiff peaks form. This is where the magic happens! You want light and airy, not dense and clumpy.
3. **Combine the Goodness: ** Gently fold the whipped cream into the melted chocolate. Be careful not to overmix! You want to keep that airiness intact.
4. **Add the Eggs: ** Lightly beat the eggs and sugar together until pale and frothy. Gently fold this mixture into the chocolate mixture.
5. **Chill Out: ** Pour the mousse into a bowl, cover with plastic wrap, and refrigerate for at least 4 hours, or preferably overnight. This is crucial for the mousse to set properly.
Step 2: Raspberry Riot: Making the Raspberry Layer
1. **Mash the Raspberries: ** In a saucepan, combine the fresh raspberries and sugar. Heat over medium heat, stirring occasionally, until the raspberries break down and release their juices.
2. **Puree Power: ** Use an immersion blender or a regular blender to puree the raspberries until smooth.
3. **Strain the Seeds (Optional): ** If you’re not a fan of raspberry seeds, strain the puree through a fine-mesh sieve.
4. **Gel That Goodness: ** Prepare your plant-based agar-agar alternative (agar-agar, pectin, or carrageenan) according to package directions. This will help the raspberry layer set up nicely.
5. **Combine and Chill: ** Stir the prepared gelling agent into the raspberry puree. Pour into a separate bowl, cover, and refrigerate for at least 2 hours, or until set.
Step 3: Assembling the Heavenly Masterpiece
1. **Cake Base: ** Place your cake base on a serving plate or cake stand.
2. **Mousse Mountain: ** Spread the chilled chocolate mousse evenly over the cake base.
3. **Raspberry River: ** Gently spread the raspberry layer over the chocolate mousse.
4. **Chill Time: ** Refrigerate the assembled cake for at least 1 hour to allow the flavors to meld together.
5. **Garnish and Glory: ** Decorate with chocolate shavings, fresh raspberries, or a dusting of cocoa powder.
6. **Serve and Prepare for Compliments: ** Slice the cake and serve immediately. Prepare for a barrage of compliments and requests for the recipe! This Heavenly Raspberry Chocolate Mousse Cake is a guaranteed crowd-pleaser.
Troubleshooting Your Way to Dessert Nirvana
Even the best bakers encounter the occasional kitchen hiccup. Don’t fret! Here are some common problems and how to fix them:
- **Mousse Not Setting:** Did you skip the chilling time? Patience is key! Also, make sure your heavy cream was cold enough before whipping.
- **Raspberry Layer Too Runny:** Make sure you used enough of the plant-based gelling agent. Follow the package directions carefully.
- **Cake Base Soggy:** Don’t over-saturate the cake base with any liquid. If using a store-bought sponge cake, it’s already moist enough.
- **Chocolate Burning:** Melt the chocolate slowly and gently. If using the microwave, use short intervals and stir frequently.
Conclusion for Heavenly Raspberry Chocolate Mousse Cake
This Heavenly Raspberry Chocolate Mousse Cake is a symphony of textures and tastes. The crisp crust, creamy mousse, and burst of raspberry come together in perfect harmony. Remember to use quality ingredients and don’t rush the chilling process. This ensures each layer achieves its optimal flavor and consistency. Whether you’re celebrating a special occasion or simply indulging in a sweet treat, this cake is guaranteed to impress and delight. So go ahead, bake up a slice of heaven!
Print
Heavenly Raspberry Chocolate Mousse Cake
Delicious heavenly raspberry chocolate mousse cake recipe with detailed instructions and nutritional information.
- Total Time: 35 minutes
- Yield: 4 servings
Ingredients
- All-purpose flour: 1 1/2 cups
- Unsweetened cocoa powder: 3/4 cup
- Granulated sugar: 1 1/2 cups
- Baking soda: 1 1/2 teaspoons
- Salt: 1 teaspoon
- Eggs: 2 large
- Vegetable oil: 1/2 cup
- Milk: 1 cup
- Vanilla extract: 2 teaspoons
- Raspberries: 1 1/2 cups (fresh or frozen)
- Semisweet chocolate chips: 1 cup
- Heavy cream: 1 1/2 cups
- Powdered sugar: 1/4 cup
Instructions
- Step 1: Preheat oven to 350°F (175°C). Grease and flour a 9-inch round cake pan.
- Step 2: In a large bowl, whisk together flour, cocoa powder, sugar, baking soda, and salt. In a separate bowl, combine eggs, oil, milk, and vanilla. Add the wet ingredients to the dry ingredients and mix until just combined. Gently fold in 1/2 cup of the raspberries.
- Step 3: Pour batter into the prepared cake pan and bake for 30-35 minutes, or until a wooden skewer inserted into the center comes out clean. Let cool in the pan for 10 minutes before inverting onto a wire rack to cool completely.
- Step 4: While the cake is cooling, melt the chocolate chips in a double boiler or microwave until smooth. Let cool slightly. In a large bowl, whip the heavy cream with powdered sugar until stiff peaks form. Gently fold in the melted chocolate.
- Step 5: Slice the cooled cake horizontally into two layers. Place the bottom layer on a serving plate and spread half of the chocolate mousse over it. Sprinkle with the remaining 1 cup raspberries. Top with the second cake layer and spread the remaining mousse over the top.
- Step 6: Refrigerate for at least 2 hours before serving to allow the mousse to set.
Notes
- Store leftover cake in the refrigerator, covered, for up to 3 days to maintain the mousse's texture.
- If the mousse has been chilled, let the cake sit at room temperature for about 15-20 minutes before serving to soften it slightly.
- Garnish each slice with a fresh raspberry and a dusting of cocoa powder for an elegant presentation.
- For a richer chocolate flavor, use high-quality dark chocolate chips instead of semisweet.
- Prep Time: 15 minutes
- Cook Time: 20 minutes
- Method: Stovetop
- Cuisine: American
FAQs
Can I use frozen raspberries for the Heavenly Raspberry Chocolate Mousse Cake?
Absolutely! Frozen raspberries are a fantastic and convenient option, especially when fresh ones are out of season. Just be sure to thaw them completely and drain any excess juice before incorporating them into the mousse or compote. Nobody wants a soggy cake bottom, unless you’re into that sort of thing (we’re not judging… much!). The flavour will be just as vibrant, and it’ll save you a trip to the grocery store. So go ahead, raid your freezer, and let’s get baking this Heavenly Raspberry Chocolate Mousse Cake!
How far in advance can I make the Heavenly Raspberry Chocolate Mousse Cake?
You can definitely make this Heavenly Raspberry Chocolate Mousse Cake ahead of time! In fact, it’s often better that way. The flavors meld together beautifully as it chills. I recommend making it one to two days in advance for optimal taste and texture. Just be sure to store it covered in the refrigerator. This gives you plenty of time to prepare for your gathering and avoids any last-minute kitchen chaos. Less stress, more deliciousness! Who wouldn’t want that?
Is there a substitute for the bittersweet chocolate in this recipe?
Yes, you can substitute semi-sweet chocolate for the bittersweet chocolate! The Heavenly Raspberry Chocolate Mousse Cake will be slightly sweeter, but still incredibly delicious. If you prefer a richer, darker flavor, you can also use a combination of dark chocolate and semi-sweet chocolate. Feel free to experiment and find what suits your palate best! After all, baking is about expressing your creativity, and making it your own. As long as it’s chocolate, it is hard to go wrong, right?
How do I prevent the crust from getting soggy?
A soggy crust is the enemy of every good dessert! To avoid this with the Heavenly Raspberry Chocolate Mousse Cake, make sure to bake the crust until it’s golden brown and slightly firm. Then, let it cool completely before adding any moist fillings. This will create a barrier against moisture absorption. Also, a thin layer of melted chocolate on the cooled crust can act as a sealant. The result? A crispy, delightful base that complements the creamy mousse and tangy raspberries perfectly!


Leave a Comment