

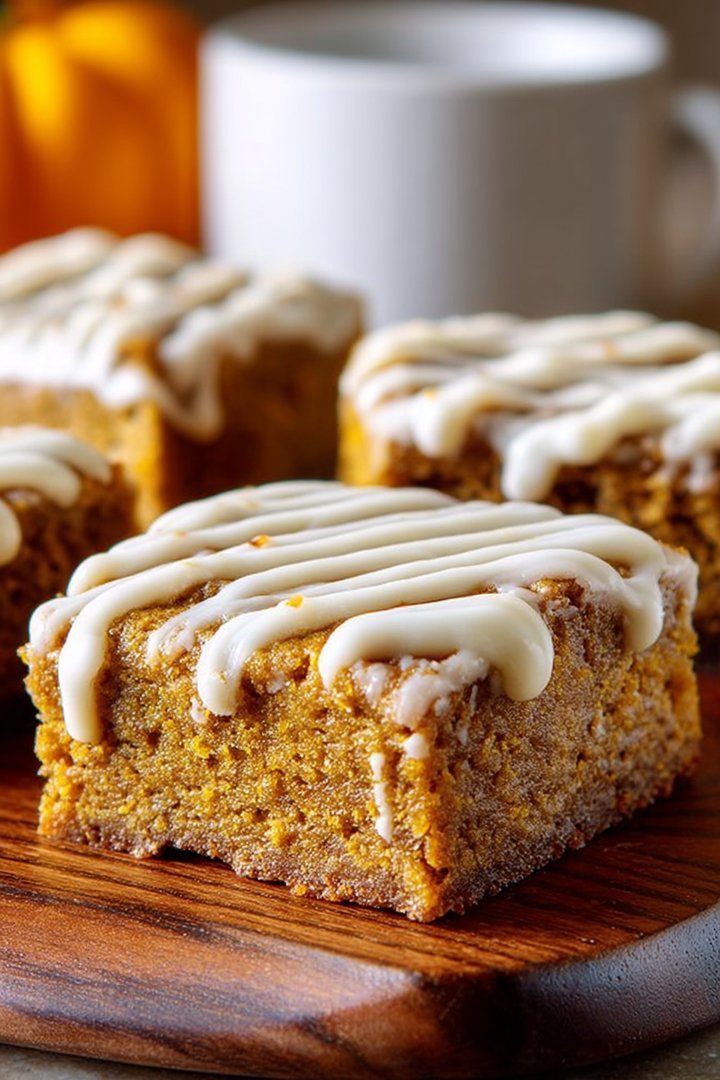
Imagine sinking your teeth into a soft, spiced cloud of pumpkin perfection, a delightful treat that whispers of autumn leaves and cozy evenings. These Gluten Free Pumpkin Bars with Icing are more than just a dessert; they’re a hug in every bite!
Each bar is a symphony of warm spices and creamy sweetness, perfectly balanced to tantalize your taste buds. They’re easy to whip up, visually appealing, incredibly flavorful, and versatile enough for any occasion.
Here are a few reasons why you’ll fall head-over-gourd for these Gluten Free Pumpkin Bars with Icing:
- Effortless to prepare, these bars come together quickly, making them perfect for both beginner bakers and seasoned pros looking for a simple delight.
- Experience the warm embrace of pumpkin spice, a symphony of cinnamon, nutmeg, and ginger harmonizing to create an unforgettable flavor profile.
- The vibrant orange hue of the pumpkin bars, topped with a luscious creamy icing, makes this dessert a feast for the eyes as well as the palate.
- Perfect as a snack, dessert, or even a delightful addition to your Harvest celebration spread; these pumpkin bars are a versatile treat for any occasion.
Ingredients for Gluten Free Pumpkin Bars with Icing
Here’s what you’ll need to make this delicious dish:
The full ingredients list, including measurements, is provided in the recipe card directly below.
How to Make Gluten Free Pumpkin Bars with Icing
Follow these simple steps to prepare this delicious dish:
Step 1: Prepare for Baking Bliss
Preheat your oven to 350°F (175°C). Grease and flour a 9×13 inch baking pan (using gluten-free flour, of course!) to prevent sticking. This sets the stage for perfectly baked bars.
Step 2: Whisk the Dry Brigade
In a large bowl, whisk together the gluten-free flour, pumpkin pie spice, baking soda, and salt. This ensures even distribution of the spices, creating that signature pumpkin flavor.
Step 3: Mix the Wet Wonders
In a separate bowl, combine the pumpkin puree, eggs, brown sugar, granulated sugar, oil, and Alcohol-free vanilla extract. Mix until well combined and smooth. This forms the rich, moist base of the bars.
Step 4: Unite the Mixtures
Gradually add the dry ingredients to the wet ingredients, mixing until just combined. Be careful not to overmix, as this can result in tough bars. A few streaks of flour are okay.
Step 5: Bake to Golden Perfection
Pour the batter into the prepared baking pan and spread evenly. Bake for 25-30 minutes, or until a toothpick inserted into the center comes out clean. Let the bars cool completely in the pan before frosting.
Step 6: Icing Extravaganza
While the bars are cooling, prepare the icing. In a medium bowl, whisk together the powdered sugar and milk or cream until smooth and creamy. Add more milk or cream if needed to reach desired consistency.
Step 7: Frost and Enjoy
Once the bars are completely cool, frost them with the prepared icing. Cut into squares and serve. These Gluten Free Pumpkin Bars with Icing are perfect with a cup of coffee or tea.
Perfecting the Cooking Process
For the most successful gluten free pumpkin bars, start by prepping all your ingredients. Measure everything out before you begin mixing. Combine your dry ingredients first, then the wet, and finally bring them together. This ensures even distribution and a perfectly moist bake.
Add Your Touch
Want to make these gluten free pumpkin bars even more your own? Consider swapping out the spices. A dash of cardamom or even a hint of chili powder can add a unique twist. Feel free to throw in some chopped pecans or walnuts for added crunch.
Storing & Reheating
These gluten free pumpkin bars are best stored in an airtight container at room temperature for up to three days. For longer storage, refrigerate them for up to a week. Reheating isn’t usually necessary, but a quick zap in the microwave can make them extra gooey.
Here are a few tips for baking perfection:
- Always use room temperature ingredients for the best emulsification, ensuring a smooth and creamy batter that bakes evenly.
- Don’t over-mix the batter. Gently fold the wet and dry ingredients together until just combined to maintain a tender crumb.
- Let the bars cool completely before frosting them; otherwise, the icing will melt right off, creating a sugary, sticky mess.
(Personal anecdote formated as paragraph subheading)
My friend Sarah once declared these were “the only gluten-free dessert that actually tastes good.” That’s high praise, folks! It made my day to see her enjoy them so much.
Gluten Free Pumpkin Bars with Icing: A Love Story (Without the Gluten!)
Okay, picture this: it’s autumn. The leaves are doing their annual performance art piece, turning vibrant shades of orange and red. The air is crisp, and you’re craving something that screams “fall!” louder than a pumpkin spice latte convention. But, alas, you’re trying to avoid gluten. What’s a person to do? Enter: these glorious gluten free pumpkin bars with icing!
Forget those dry, crumbly gluten-free desserts that taste like sadness and cardboard. These pumpkin bars are moist, flavorful, and so decadent you’ll swear they’re made with magic. Seriously, they’re like a warm hug for your taste buds.
We’ve all been there, right? Staring longingly at the bakery case, knowing most of those tempting treats are off-limits. It’s a cruel world for the gluten-averse, I tell you! But fear not, my friends, because this recipe is about to change everything.
This isn’t just another gluten-free recipe. It’s a carefully crafted masterpiece designed to deliver all the autumnal goodness you crave, without the gluten-induced stomachaches. And the icing? Oh, the icing is the star of the show. Creamy, sweet, and perfectly balanced, it elevates these bars from “delicious” to “downright addictive.”
Why Gluten Free Pumpkin Bars? Because You Deserve Happiness!
Let’s be honest, sometimes you just need a little something sweet. And when that craving hits in the fall, pumpkin is the only answer. These gluten free pumpkin bars are the perfect solution for several reasons:
First, they are incredibly easy to make. Seriously, if I can make them, anyone can. There’s no need for fancy equipment or complicated techniques. Just a bowl, a mixer, and a little bit of love.
Second, they are packed with flavor. Pumpkin, cinnamon, nutmeg, and ginger combine to create a symphony of autumnal spices that will transport you to a cozy cabin in the woods (even if you’re just sitting on your couch in your pajamas).
Third, they are gluten-free! Which means you can indulge without the guilt or the tummy troubles. Hooray for deliciousness without consequences!
Finally, they are guaranteed to impress. Whether you’re bringing them to a potluck, serving them at a party, or just enjoying them at home with a cup of tea, these bars are always a crowd-pleaser.
Key Ingredients: The Secret to Success
Before we dive into the recipe, let’s talk about the key ingredients that make these gluten free pumpkin bars so amazing:
- **Gluten-Free Flour Blend:** This is the foundation of our bars. Make sure to use a high-quality blend that contains xanthan gum, which helps to bind the ingredients together and create a tender crumb.
- **Pumpkin Puree:** Not pumpkin pie filling! We want pure pumpkin goodness, unsweetened and unadulterated.
- **Pumpkin Pie Spice:** This magical blend of cinnamon, nutmeg, ginger, and cloves is what gives these bars their signature autumnal flavor.
- **Eggs:** These provide structure and moisture to the bars.
- **Sugar:** Because, let’s face it, we all need a little sweetness in our lives.
- **Oil:** This adds richness and moisture to the bars.
- **Cream Cheese:** The secret ingredient in the icing! It adds a tangy creaminess that perfectly complements the sweetness of the pumpkin bars.
- **Powdered Sugar:** For the perfect smooth and sweet icing.
- **Alcohol-free vanilla extract:** A touch of vanilla enhances all the other flavors.
Let’s Get Baking: The Recipe
Alright, enough chit-chat. Let’s get down to business and make some gluten free pumpkin bars with icing!
What You’ll Need: Ingredients List
Here’s a detailed list of everything you’ll need:
**For the Bars: **
- 1 ½ cups gluten-free all-purpose flour blend (with xanthan gum)
- 1 teaspoon baking powder
- ½ teaspoon baking soda
- 1 teaspoon pumpkin pie spice
- ½ teaspoon salt
- 1 cup granulated sugar
- ½ cup packed brown sugar
- ½ cup vegetable oil
- 1 cup pumpkin puree
- 2 large eggs
- 1 teaspoon Alcohol-free vanilla extract
**For the Icing: **
- 4 ounces cream cheese, softened
- ½ cup (1 stick) unsalted butter, softened
- 3 cups powdered sugar
- 2 tablespoons milk
- 1 teaspoon Alcohol-free vanilla extract
Step-by-Step Instructions: Baking Brilliance
Follow these simple steps to create your gluten free pumpkin bar masterpiece:
1. **Preheat and Prep: ** Preheat your oven to 350°F (175°C). Grease and flour a 9×13 inch baking pan. Gluten-free flour works best for dusting to avoid sticking.
2. **Combine Dry Ingredients: ** In a large bowl, whisk together the gluten-free flour, baking powder, baking soda, pumpkin pie spice, and salt.
3. **Combine Wet Ingredients: ** In a separate bowl, whisk together the granulated sugar, brown sugar, oil, pumpkin puree, eggs, and Alcohol-free vanilla extract.
4. **Combine Wet and Dry: ** Gradually add the wet ingredients to the dry ingredients, mixing until just combined. Be careful not to overmix!
5. **Pour and Bake: ** Pour the batter into the prepared baking pan and spread evenly. Bake for 25-30 minutes, or until a toothpick inserted into the center comes out clean.
6. **Cool Completely: ** Let the bars cool completely in the pan before frosting. This is crucial! Otherwise, your icing will melt.
7. **Make the Icing: ** While the bars are cooling, prepare the icing. In a large bowl, beat together the softened cream cheese and butter until smooth and creamy.
8. **Add Sugar and Milk: ** Gradually add the powdered sugar, alternating with the milk, beating until smooth and fluffy. Stir in the Alcohol-free vanilla extract.
9. **Frost and Enjoy: ** Once the bars are completely cool, frost them with the cream cheese icing. Cut into squares and enjoy!
Variations and Substitutions: Unleash Your Creativity
Want to put your own spin on these gluten free pumpkin bars? Here are a few ideas:
- **Chocolate Chips:** Add ½ cup of chocolate chips to the batter for a chocolatey twist.
- **Nuts:** Sprinkle chopped pecans or walnuts on top of the bars before baking for added crunch.
- **Spiced Icing:** Add a pinch of cinnamon or nutmeg to the icing for extra warmth.
- **Dairy-Free:** Use dairy-free cream cheese and butter alternatives to make these bars dairy-free.
- **Sugar-Free:** Substitute the sugar with a sugar-free alternative like erythritol or stevia.
Tips and Tricks: Pro Baker Secrets
Here are a few extra tips to ensure your gluten free pumpkin bars are perfect every time:
- **Measure Your Flour Correctly:** Spoon the gluten-free flour into your measuring cup and level it off with a knife. Avoid scooping directly from the bag, which can pack the flour and result in dry bars.
- **Don’t Overbake:** Overbaked gluten-free desserts can be dry and crumbly. Keep a close eye on the bars and remove them from the oven as soon as a toothpick comes out clean.
- **Use Room Temperature Ingredients:** Room temperature ingredients blend together more easily, resulting in a smoother batter and more even baking.
- **Chill the Icing:** If your icing is too thin, chill it in the refrigerator for 30 minutes to an hour to thicken it up.
Conclusion: Gluten Free Pumpkin Bar Bliss
There you have it: the ultimate recipe for gluten free pumpkin bars with icing! These bars are easy to make, packed with flavor, and guaranteed to satisfy your autumnal cravings. So go ahead, grab your apron, and get baking. You deserve a little bit of pumpkin spice happiness in your life!
And remember, baking is all about having fun. Don’t be afraid to experiment, get creative, and make these bars your own. Happy baking!
Nutritional Information: A Balanced Treat
(Note: Nutritional information is approximate and may vary depending on the specific ingredients used.)
Serving Size: 1 bar
- Calories: Approximately 250-300
- Fat: 15-20g
- Carbohydrates: 30-35g
- Protein: 3-4g
Perfecting the Cooking Process
For ideal results, ensure all ingredients are at room temperature before mixing. Start by whisking dry ingredients, then combine wet components separately. Gently fold the wet into the dry until just combined. Avoid overmixing to maintain a tender crumb.
Add Your Touch
Customize these pumpkin bars with various mix-ins. Consider adding chopped walnuts, pecans, or even dried cranberries. A swirl of maple syrup into the batter can also enhance the autumnal flavor profile beautifully.
Storing & Reheating
To maintain freshness, store the baked and iced pumpkin bars in an airtight container in the refrigerator. They can be gently reheated in a microwave for a few seconds for a warm, comforting treat, though they’re delightful cold, too.
Here are a few tips for baking perfection:
- Always gently measure your gluten-free flour to avoid over-packing; this ensures a lighter and more tender crumb in your bars.
- To prevent sticking, line your baking pan with parchment paper, leaving an overhang to easily lift the finished bars out.
- Don’t skip chilling the cream cheese icing; it helps firm it up, making it easier to spread evenly and preventing it from melting.
(Personal anecdote formated as paragraph subheading)
I once forgot the Alcohol-free vanilla extract, and they still tasted great! It just goes to show that even mistakes can lead to delicious results. Just embrace the imperfections!
Conclusion for Gluten Free Pumpkin Bars with Icing :
These Gluten Free Pumpkin Bars with Icing are a simple yet satisfying treat, perfect for anyone craving that cozy fall flavor without the gluten. Remember to properly measure your gluten-free flour and avoid overbaking. A simple cream cheese icing elevates these bars to an irresistible dessert, making them a crowd-pleaser for any occasion. Enjoy the spiced goodness of these treats, whether freshly baked or stored for later enjoyment!
Print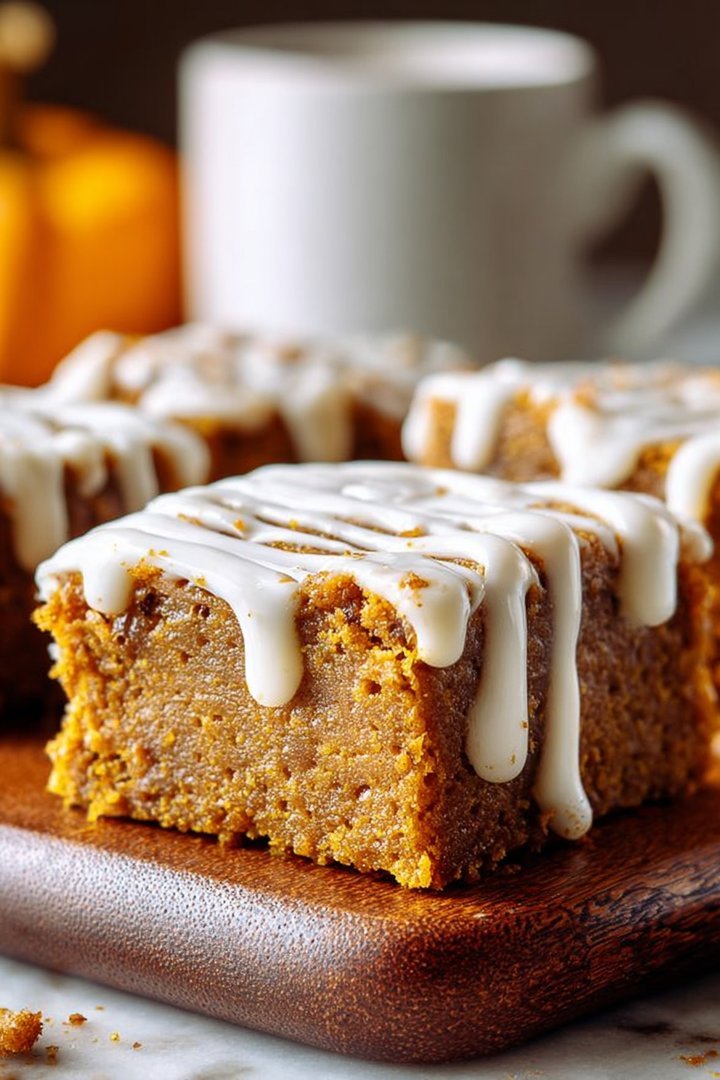
Gluten Free Pumpkin Bars with Icing
Delicious gluten free pumpkin bars with icing recipe with detailed instructions and nutritional information.
- Total Time: 35 minutes
- Yield: 4 servings
Ingredients
- Gluten-Free All-Purpose Flour: 1 1/2 cups
- Pumpkin Puree: 1 cup
- Eggs: 2 large
- Brown Sugar: 1 cup, packed
- Granulated Sugar: 1/2 cup
- Pumpkin Pie Spice: 2 teaspoons
- Baking Soda: 1 teaspoon
- Cream Cheese: 4 oz, softened
- Powdered Sugar: 2 cups
- Milk: 2-3 tablespoons
Instructions
- Step 1: Preheat oven to 350°F (175°C). Grease and flour a 9×13 inch baking pan with gluten-free flour.
- Step 2: In a large bowl, combine gluten-free flour, pumpkin pie spice, and baking soda.
- Step 3: In a separate bowl, beat together pumpkin puree, eggs, brown sugar, and granulated sugar until well combined.
- Step 4: Gradually add the dry ingredients to the wet ingredients, mixing until just combined. Pour batter into the prepared pan.
- Step 5: Bake for 25-30 minutes, or until a toothpick inserted into the center comes out clean. Let cool completely before frosting.
- Step 6: For the icing, beat together softened cream cheese and powdered sugar until smooth. Gradually add milk until desired consistency is reached. Spread icing over cooled bars and cut into squares.
Notes
- Store leftover pumpkin bars in an airtight container in the refrigerator to keep the icing fresh and the bars moist.
- For a warm, comforting treat, gently microwave individual bars for 10-15 seconds before serving.
- These bars are delightful on their own, but a sprinkle of chopped pecans or walnuts adds a lovely crunch and flavor.
- Chef's tip: Make sure your cream cheese is truly softened for the icing to avoid any lumps and achieve the perfect smooth consistency.
- Prep Time: 15 minutes
- Cook Time: 20 minutes
- Method: Stovetop
- Cuisine: American
FAQs :
Can I make these Gluten Free Pumpkin Bars with Icing ahead of time?
Absolutely! These bars are fantastic make-ahead treats. After baking and icing, you can store them in an airtight container in the refrigerator for up to five days. The cool temperature actually enhances the moist texture and allows the spices to meld together even more beautifully. This makes them perfect for parties or potlucks where you want to get a head start on the baking. Just be sure to let them come to room temperature before serving for the best flavor and texture experience. They are equally delightful slightly chilled, though!
What’s the best way to store my Gluten Free Pumpkin Bars?
Proper storage is key to maintaining the delightful texture of these gluten-free pumpkin squares. The best method is to keep them in an airtight container. At room temperature, they’ll stay fresh for about three days. In the refrigerator, they’ll last for up to five days, offering a cooler treat option. For longer storage, consider freezing them. Wrap the bars individually in plastic wrap and then place them in a freezer-safe bag. They can be frozen for up to two months. Thaw them in the refrigerator overnight before serving to enjoy their spiced goodness.
Can I use a different type of flour for these pumpkin bars?
While this recipe is specifically designed for gluten-free flour to achieve that perfect tender crumb, you can experiment! However, keep in mind that different flours absorb moisture differently. If you are adventurous, try a blend of almond and coconut flour, but you might need to adjust the amount of liquid to get the right batter consistency. Tapioca starch can also enhance the chewiness. Always research the properties of any new flour before swapping it in, and be prepared for a slightly different outcome in terms of texture and taste!
How do I know when my Gluten Free Pumpkin Bars are done?
The toothpick test is your best friend here! Insert a toothpick into the center of the bars. If it comes out clean, or with just a few moist crumbs clinging to it, they are done. Be careful not to overbake them, as this can lead to dry bars. Remember, oven temperatures can vary, so start checking for doneness a few minutes before the recommended baking time. The edges should be lightly golden brown, and the top should spring back slightly when gently pressed.

Leave a Comment