


Imagine sinking your teeth into a dessert that’s both comforting and invigorating, a symphony of coffee and creamy sweetness that dances on your tongue. This **Coffee Slice** isn’t just a treat; it’s an experience.
I still remember my grandmother making a similar dessert, the aroma of coffee permeating her kitchen. It was more than just baking; it was love made edible. Today, we recreate that magic with a modern twist.
- Effortlessly combine the rich, bold taste of coffee with a silky smooth, creamy texture in every bite.
- Impress your friends and family with a visually stunning dessert that tastes as good as it looks.
- Enjoy the perfect balance of flavors, making it an ideal treat for any time of day, be it breakfast or after-dinner.
- Customize this recipe to your liking with optional toppings like chocolate shavings or a sprinkle of cinnamon.
Ingredients for Coffee Slice
Here’s what you’ll need to make this delicious dish:
The full ingredients list, including measurements, is provided in the recipe card directly below.
How to Make Coffee Slice
Follow these simple steps to prepare this delicious dish:
Step 1: Prepare the Graham Cracker Base
Crush the graham crackers into fine crumbs using a food processor or by placing them in a sealed bag and crushing them with a rolling pin. Melt the unsalted butter in a microwave-safe bowl or on the stovetop. Combine the graham cracker crumbs and melted butter in a bowl, mixing well until the crumbs are evenly moistened.
Step 2: Press the Base into the Pan
Press the graham cracker mixture firmly into the bottom of a 9×13 inch baking dish. Use the bottom of a measuring cup or a flat spatula to create an even and compact layer. Place the baking dish in the refrigerator to chill while you prepare the coffee layer.
Step 3: Prepare the Coffee Mixture
In a saucepan, combine the strong brewed coffee, heavy cream, granulated sugar, and Alcohol-free vanilla extract. Whisk together until the sugar is dissolved. Bring the mixture to a simmer over medium heat, stirring occasionally to prevent scorching.
Step 4: Add the Agar-Agar
In a small bowl, whisk together the agar-agar powder with the almond milk until it is completely dissolved. Pour the agar-agar mixture into the simmering coffee mixture, whisking constantly to prevent lumps from forming. Continue to simmer for 2-3 minutes, stirring continuously until the agar-agar is fully dissolved and the mixture thickens slightly.
Step 5: Pour and Chill
Remove the baking dish from the refrigerator. Pour the coffee mixture evenly over the chilled graham cracker base. Smooth the surface with a spatula. Cover the baking dish with plastic wrap, pressing it gently against the surface of the coffee mixture to prevent a skin from forming.
Step 6: Chill and Serve
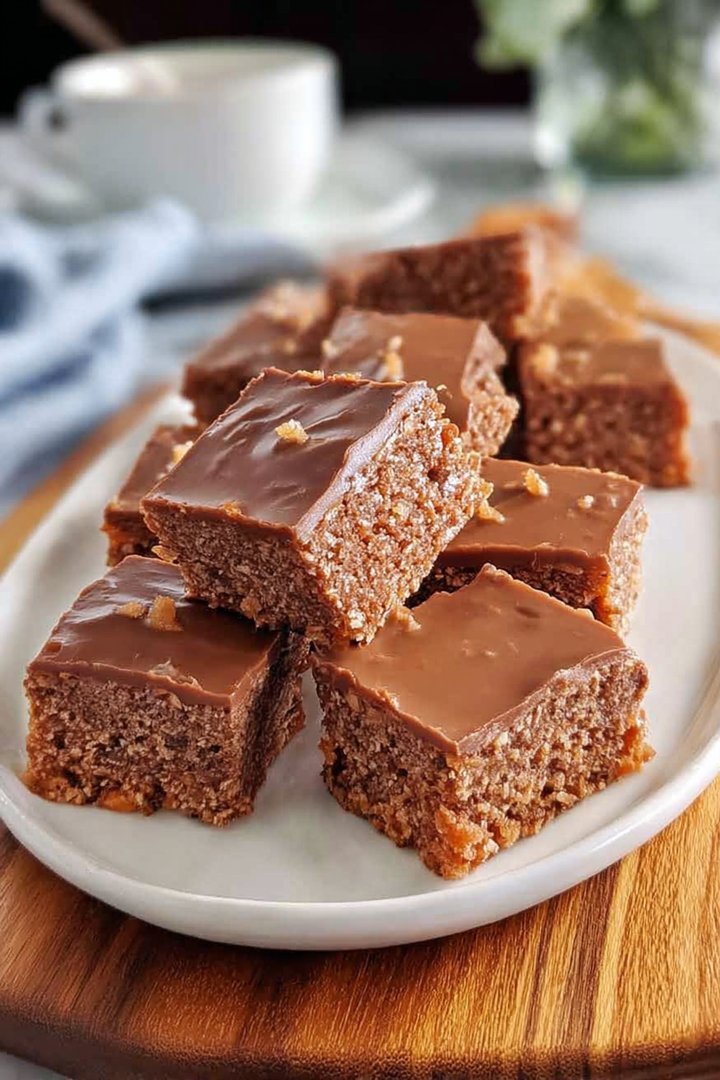
Refrigerate the Coffee Slice for at least 4-6 hours, or preferably overnight, to allow it to set completely. Once set, cut the slice into squares and serve chilled. Garnish with chocolate shavings or a sprinkle of cinnamon, if desired, for an extra touch of elegance.
Perfecting the Cooking Process
To make the best coffee slice, start by preparing the crust first and let it cool. Brew your coffee extra strong while the crust bakes. Then, focus on creating the creamy coffee filling while the crust cools. This ensures the perfect balance and flavor in every bite.
Add Your Touch
Feel free to swap out the Alcohol-free vanilla extract with alcohol-free almond extract for a nutty twist. Or, add a layer of chocolate ganache between the crust and the coffee filling for an extra decadent treat. Sprinkle some cocoa powder on top for added eye candy.
Storing & Reheating
Store your delightful coffee slice in the refrigerator, covered, for up to three days. There’s usually not much left that long anyway! No reheating is needed; this slice is best served cold, straight from the fridge for that refreshing coffee kick.
Here are some chef-approved tips to elevate your coffee slice game:
- Use high-quality instant coffee for an intense coffee flavor that shines through in every mouthful. It’s a game-changer.
- Avoid overbaking the crust; a slightly underbaked crust is better than a dry one, keeping the texture perfect.
- Let the coffee slice set completely in the fridge before slicing. This prevents a messy slice and ensures perfect presentation.
(Personal anecdote formated as paragraph subheading)
My friend Sarah, a self-proclaimed coffee addict, declared this slice the best thing since sliced bread. She requested it for her birthday, and let’s just say, there wasn’t a crumb left by the end of the party.
The Allure of Coffee Slice: A Journey Begins
Ever found yourself staring longingly at the pastry display, eyes fixated on that one tempting coffee-flavored goodie? Well, you’re not alone! The coffee slice is more than just a dessert; it’s a symphony of flavors, a dance of textures, and a hug for your soul, all wrapped up in a neat, irresistible package. And, let’s face it, the aroma alone is enough to make even the most disciplined dieter weak at the knees.
Now, some might argue that baking is intimidating, akin to navigating a minefield blindfolded. But fear not, intrepid baker! This coffee slice recipe is designed to be your culinary compass, guiding you through each step with ease and a sprinkle of humor. We’ll transform you from a kitchen novice into a coffee slice connoisseur in no time.
Why coffee slice, you ask? Because it’s versatile, adaptable, and utterly delightful. Whether you’re a coffee aficionado, a dessert enthusiast, or simply someone looking to impress your friends and family, this recipe is your golden ticket to baking stardom. So, grab your apron, preheat your oven, and let’s dive into the wonderful world of coffee slice!
Decoding the Coffee Slice: What Makes it Special?
What exactly is it about a coffee slice that makes it so darn irresistible? Is it the rich coffee flavor that tingles your taste buds? Is it the creamy texture that melts in your mouth? Or perhaps it’s the satisfying crunch of the base that brings it all together? Well, my friend, it’s all of the above, and then some!
A truly great coffee slice is a carefully crafted masterpiece, where every element plays a vital role. The base provides the foundation, offering a delightful contrast to the smooth, velvety filling. The coffee flavor is the star of the show, bold and aromatic, yet perfectly balanced so that it doesn’t overpower the other ingredients. And the texture? Oh, the texture is a dream, a harmonious blend of creamy, crunchy, and oh-so-satisfying.
But the magic of a coffee slice extends beyond its taste and texture. It’s also about the experience, the moment you take that first bite and feel a wave of pure bliss wash over you. It’s about sharing it with loved ones, creating memories, and savoring the simple pleasures in life. A coffee slice is not just a dessert; it’s an invitation to slow down, appreciate the moment, and indulge in a little bit of happiness.
Gather Your Arsenal: Ingredients You’ll Need
Before we embark on our coffee slice adventure, let’s gather our ingredients. Fear not, you won’t need any exotic or hard-to-find items. Just a few basic pantry staples, a touch of coffee magic, and a whole lot of enthusiasm!
For the base, you’ll need flour, sugar, and butter. These are the holy trinity of baking, the foundation upon which all delicious desserts are built. For the coffee filling, you’ll need cream cheese, sugar, instant coffee (the good stuff!), and a plant-based gelling agent like agar-agar.
And don’t forget the secret ingredient: a dash of Alcohol-free vanilla extract. This humble extract adds a subtle layer of flavor that elevates the entire slice, transforming it from good to extraordinary.
So, there you have it, our ingredient list. Simple, straightforward, and readily available. Now, let’s get cooking!
Crafting the Coffee Slice Crust: The Foundation of Flavor
Our journey begins with the crust, the sturdy foundation upon which our coffee slice dreams will be built. We’re not aiming for a boring, bland crust here. Oh no, we want a crust that’s crisp, golden, and bursting with flavor!
Combine flour, sugar, and cold butter in a bowl. Use a pastry blender or your fingertips to cut the butter into the flour until the mixture resembles coarse crumbs. Don’t overmix! You want small pockets of butter to remain intact, creating a flaky crust.
Press the mixture into the bottom of a baking pan, creating an even layer. Prick the crust with a fork to prevent it from puffing up during baking. Bake until golden brown and fragrant.
Once baked, let the crust cool completely before adding the filling. This is crucial! A warm crust will melt the filling, resulting in a soggy mess. And nobody wants a soggy coffee slice!
Whipping Up the Coffee Filling: A Symphony of Creaminess
Now for the star of the show: the coffee filling! This is where the magic happens, where the coffee flavor takes center stage, and the texture becomes oh-so-creamy and dreamy.
In a large bowl, beat the cream cheese until smooth and fluffy. Add sugar and instant coffee, and continue beating until well combined. Make sure there are no lumps of cream cheese or coffee granules lurking in the mixture!
In a separate saucepan, dissolve your plant-based gelling agent in a bit of water. Bring to a simmer, stirring constantly until the gelling agent is fully dissolved. Let it cool slightly, then gradually add it to the cream cheese mixture, beating until smooth.
Pour the coffee filling over the cooled crust, spreading it evenly. Cover the slice with plastic wrap and refrigerate for at least four hours, or preferably overnight. This will allow the filling to set properly and develop its full flavor.
The Grand Finale: Slicing, Serving, and Savoring
After patiently waiting for the coffee slice to set, the moment of truth has arrived! It’s time to slice, serve, and savor the fruits of your labor.
Remove the coffee slice from the refrigerator and carefully slice it into neat squares or rectangles. Use a sharp knife and wipe it clean between slices for a professional-looking presentation.
Arrange the slices on a platter and prepare to be amazed by the sheer beauty of your creation. The golden crust, the creamy coffee filling, it’s a sight to behold!
Now, take a bite and let the symphony of flavors and textures transport you to dessert heaven. The crisp crust, the creamy filling, the bold coffee flavor, it’s a culinary masterpiece!
Share it with your friends and family, and bask in their admiration. You are now officially a coffee slice baking superstar!
Troubleshooting Tips: Because Even Chefs Have Oops Moments
Let’s face it, even the most experienced bakers encounter the occasional hiccup. Fear not, I’m here to help you navigate any potential coffee slice catastrophes.
*Crust too hard?* You may have overbaked it. Try reducing the baking time next time, or use a slightly higher fat content flour.
*Filling too runny?* You may not have used enough plant-based gelling agent, or you may not have refrigerated the slice long enough. Make sure to follow the recipe carefully and allow ample time for the filling to set.
*Coffee flavor too weak?* Use a higher quality instant coffee, or add a tablespoon of coffee extract to the filling.
Coffee Slice Variations: Let Your Creativity Shine
The basic coffee slice recipe is a fantastic starting point, but feel free to unleash your creativity and experiment with different variations.
*Chocolate Coffee Slice: * Add cocoa powder to the crust and a layer of chocolate ganache between the crust and the filling.
*Mocha Coffee Slice: * Add chocolate syrup to the coffee filling for a delightful mocha twist.
*Spiced Coffee Slice: * Add cinnamon, nutmeg, and ginger to the crust for a warm and cozy flavor.
*Nutty Coffee Slice: * Add chopped nuts to the crust or sprinkle them on top of the filling for a crunchy texture.
The possibilities are endless! Let your imagination run wild and create a coffee slice that’s uniquely yours.
Conclusion for Coffee Slice :
This Coffee Slice is a simple yet elegant dessert, easy to make and impressive to serve. Remember to use strong, freshly brewed coffee for the best flavor and let it set completely to avoid a soggy disaster. Experiment with different biscuit types to find your perfect base, and store leftovers properly. This is a delightful treat that will surely become a favorite for coffee lovers and dessert enthusiasts alike! Enjoy every bite of your homemade Coffee Slice.
Print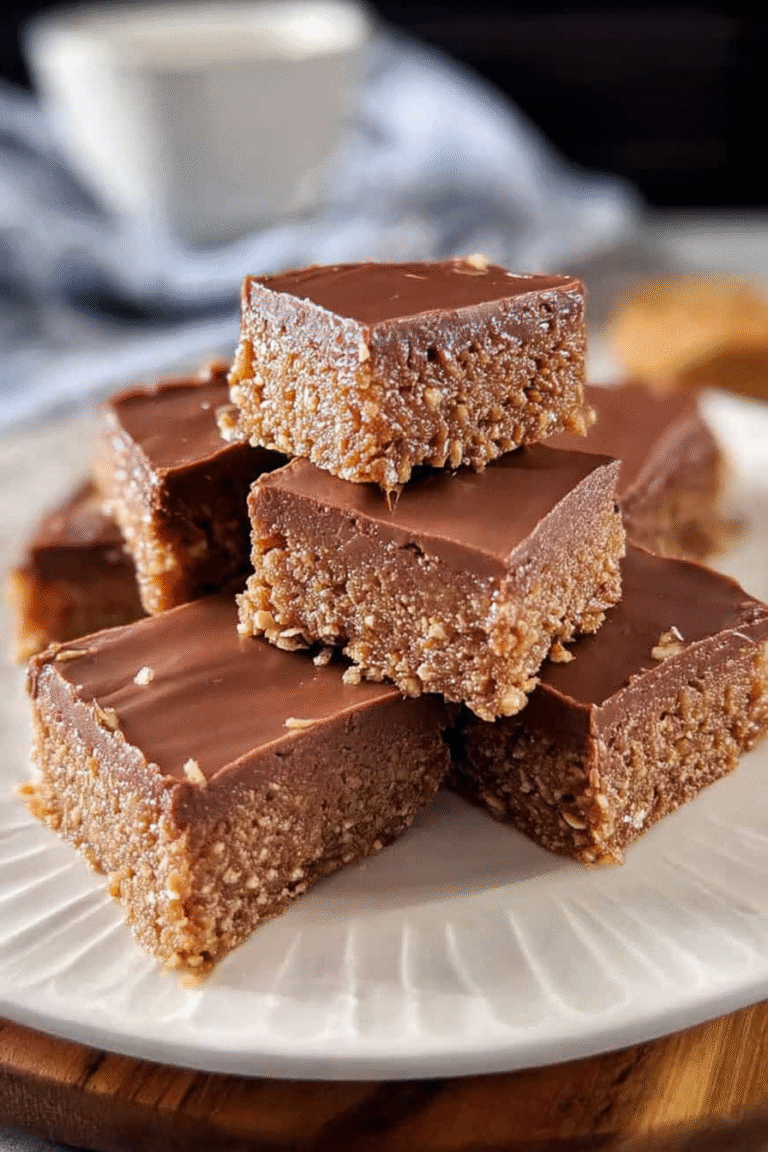
Coffee Slice
Delicious coffee slice recipe with detailed instructions and nutritional information.
- Total Time: 35 minutes
- Yield: 4 servings
Ingredients
- Digestive biscuits, crushed: 250g
- Unsalted butter, melted: 125g
- Sweetened condensed milk: 395g
- Instant coffee granules: 2 tablespoons
- Boiling water: 2 tablespoons
- Milk chocolate, chopped: 200g
- White chocolate, melted (for drizzle): 50g
Instructions
- Step 1: Combine the crushed digestive biscuits and melted butter in a bowl. Press the mixture firmly into the base of a lined 20cm square baking tin.
- Step 2: Dissolve the instant coffee granules in the boiling water.
- Step 3: In a separate bowl, mix the dissolved coffee with the sweetened condensed milk. Pour this mixture evenly over the biscuit base.
- Step 4: Melt the chopped milk chocolate. Pour the melted chocolate over the coffee layer and spread evenly.
- Step 5: Drizzle the melted white chocolate decoratively over the top of the milk chocolate layer.
- Step 6: Refrigerate for at least 2 hours, or until set. Cut into slices before serving.
Notes
- Store the coffee slice in an airtight container in the fridge to keep it firm and prevent it from drying out.
- If you prefer a softer slice, let it sit at room temperature for about 15 minutes before serving.
- Serve this coffee slice with a dollop of whipped cream or a scoop of vanilla ice cream to complement the rich flavours.
- For a richer coffee flavour, bloom the coffee granules in the boiling water for a minute before mixing with the condensed milk.
- Prep Time: 15 minutes
- Cook Time: 20 minutes
- Method: Stovetop
- Cuisine: American
FAQs :
Can I use instant coffee for this Coffee Slice recipe?
Well, you certainly *could* use instant coffee, but imagine serving a lukewarm cup of convenience store coffee to your discerning grandmother. You wouldn’t, would you? Using freshly brewed, strong coffee will give your Coffee Slice a depth of flavor that instant granules simply can’t match. Think of it as upgrading from a bicycle to a Ferrari – both will get you there, but one is significantly more enjoyable. So, for a truly decadent experience, stick with the real deal and brew yourself a lovely, robust cup to use in this recipe!
How do I prevent my Coffee Slice from being soggy?
Ah, the dreaded soggy slice! The key to avoiding this culinary catastrophe lies in a few sneaky tricks. First, ensure your biscuit base is properly baked and cooled completely before adding the coffee mixture. Think of the biscuits as a sponge – if they are already damp, they’ll soak up even more liquid! Second, allow the Coffee Slice to set completely in the refrigerator. Patience is a virtue, especially when it comes to dessert. Rushing the chilling process is a surefire way to end up with a mushy mess. Finally, don’t over-saturate the biscuit base with coffee.
What kind of biscuits work best for a Coffee Slice?
Honestly, the world is your oyster when it comes to biscuits for this Coffee Slice! But here’s a little secret: plain, slightly sweet biscuits are your best bet. Think digestive biscuits, graham crackers, or even vanilla wafers. Avoid anything too rich or strongly flavored, as you want the coffee flavor to really shine. The biscuits are simply there to provide a textural base and a touch of sweetness. So raid your pantry, unleash your inner biscuit connoisseur, and choose a champion for your Coffee Slice masterpiece!
How long will the Coffee Slice last in the refrigerator?
This Coffee Slice, if stored properly, will last about 3-4 days in the refrigerator. However, let’s be honest, it’s doubtful it’ll survive that long! To maximize its lifespan (should any miraculous leftovers occur), store it in an airtight container. This will prevent it from drying out or absorbing any unwanted flavors from other fridge inhabitants. And remember, always give it a little sniff and a peek before diving in, just to be on the safe side. Although, with a creation this delicious, chances are it will be gone long before any expiration dates become relevant.


Leave a Comment