

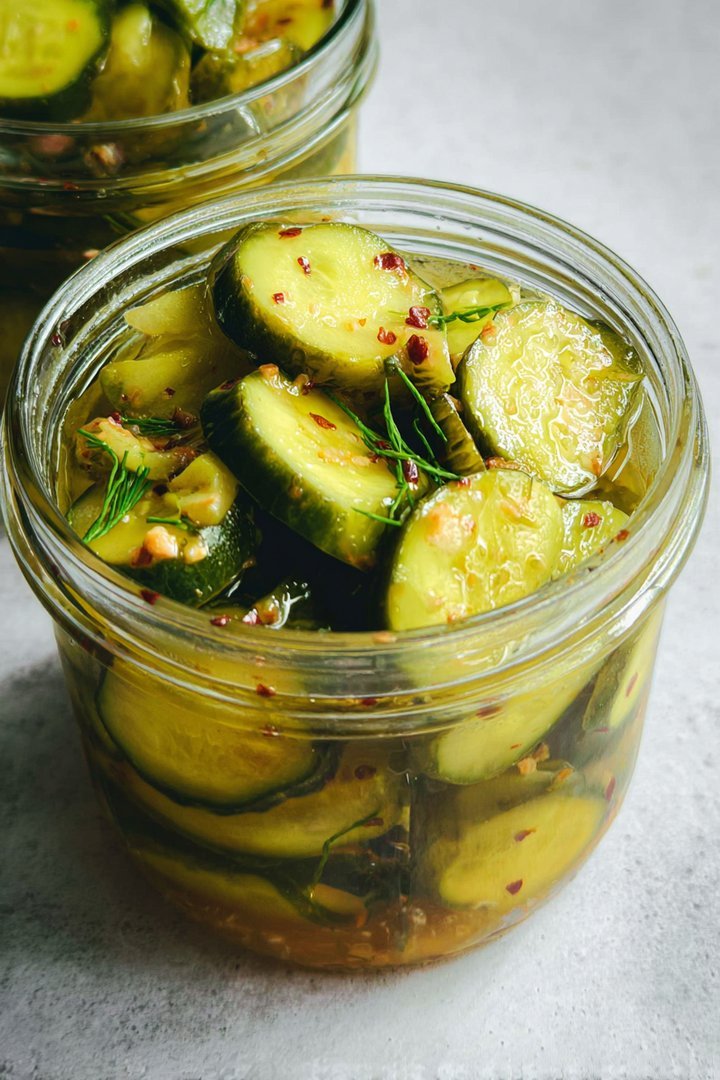
Imagine biting into a crisp, sweet, tangy slice of sunshine. That’s precisely the sensation you get when you taste homemade Bread and Butter Pickles. They’re not just pickles; they are a symphony of flavors dancing on your tongue.
These pickles evoke memories of summer picnics, overflowing mason jars, and the satisfying crunch that only a perfectly pickled cucumber can deliver. Bread and Butter Pickles are the unsung heroes of every barbecue, the secret weapon in your sandwich arsenal, and the star of your relish tray.
- Effortless recipe yields vibrant, crunchy pickles in just a few simple steps.
- The perfect balance of sweet, sour, and savory creates an unforgettable taste.
- Visually appealing with their bright yellow hue and uniform slices.
- Incredibly versatile, they enhance burgers, sandwiches, salads, and more.
Ingredients for Bread and Butter Pickles
Here’s what you’ll need to make this delicious dish:
The full ingredients list, including measurements, is provided in the recipe card directly below.
How to Make Bread and Butter Pickles
Follow these simple steps to prepare this delicious dish:
Step 1: Prepare the Cucumbers and Onions
Wash the cucumbers thoroughly. Slice them into 1/4-inch thick rounds. Peel the onions and slice them thinly. Place the cucumber and onion slices in a large bowl.
Step 2: Combine Salt and Let Stand
Sprinkle the salt over the cucumber and onion mixture. Toss well to ensure the salt is evenly distributed. Let the mixture stand for at least 2 hours, or preferably overnight, in the refrigerator. This step helps draw out excess moisture, resulting in crispier pickles.
Step 3: Prepare the Pickling Brine
In a large, non-reactive saucepan (stainless steel or enamel-coated), combine the white vinegar, granulated sugar, mustard seeds, celery seeds, and turmeric powder. Bring the mixture to a boil over medium-high heat, stirring constantly until the sugar dissolves completely.
Step 4: Combine and Cook
Drain the cucumber and onion mixture in a colander. Rinse them thoroughly with cold water to remove excess salt. Add the drained cucumber and onion slices to the boiling pickling brine. Reduce the heat to medium and simmer for about 10 minutes, or until the cucumbers turn a slightly translucent color and the onions are tender-crisp.
Step 5: Jar the Pickles
Carefully transfer the hot pickles and brine into sterilized jars, leaving 1/2-inch of headspace. Remove any air bubbles by gently tapping the jars on a countertop or using a utensil. Wipe the rims of the jars clean with a damp cloth.
Step 6: Process or Refrigerate
For long-term storage, process the jars in a boiling water bath for 10 minutes. Alternatively, let the jars cool completely and store them in the refrigerator. Refrigerated pickles will be ready to eat in about 24 hours and will last for several weeks.
Perfecting the Cooking Process
To achieve pickle perfection, it’s all about timing. First, prepare your brine, ensuring it’s properly balanced. Next, slice your cucumbers uniformly. Finally, pack them tightly into sterilized jars and pour the hot brine over them, leaving just enough space at the top.
Add Your Touch
Want to make these pickles your own? Experiment with different spices! Try adding a pinch of red pepper flakes for a kick, or some fresh dill for a summery flavor. You could also swap out white vinegar for apple cider vinegar for a sweeter taste.
Storing & Reheating
Once your jars have cooled and sealed, store them in a cool, dark place for at least two weeks to allow the flavors to meld. Once opened, keep them refrigerated. These pickles are best enjoyed cold straight from the fridge!
- For a crispier pickle, soak the cucumber slices in an ice water bath for an hour before pickling. This helps to draw out excess moisture.
- Don’t overcook the brine! Boiling it too long can cause the vinegar to lose its potency, resulting in softer pickles.
- Ensure your jars are properly sterilized to prevent spoilage. Nobody wants a science experiment instead of crunchy pickles.
(Personal anecdote formated as paragraph subheading (very important! don’t write any title for this paragraph))
My grandma used to make these every summer. The whole family would gather for “pickle day,” and the aroma of vinegar and spices filled the air. Those pickles were pure summer joy.
Oh, cucumbers. Those humble green cylinders that spend their lives dreaming of becoming something…more. And what could be more than transformed into crunchy, tangy, sweet, and utterly addictive **Bread and Butter Pickles**? Forget those sad, soggy store-bought excuses. We’re diving headfirst into the world of homemade pickle perfection. Get ready, because this journey is going to be briny, slightly ridiculous, and completely worth it.
The Cucumber Chronicle: Choosing Your Weapon
First things first, let’s talk cucumbers. Not all cucumbers are created equal in the pickleverse. You’re looking for pickling cucumbers, naturally. These guys are shorter, thicker, and have a slightly bumpier skin than your regular salad variety. Think of them as the bodybuilders of the cucumber world.
Why pickling cucumbers? Because they hold their shape and crunch better when submerged in a vinegary brine. Nobody wants a mushy pickle. Unless, of course, you *do* want a mushy pickle. In that case, carry on with your bad self! But for the rest of us crunch-cravers, pickling cucumbers are the way to go.
If you can’t find pickling cucumbers, English cucumbers (the long, skinny ones wrapped in plastic) can work in a pinch. Just be sure to peel them, as their skin can be a bit tough. And maybe send them a motivational speech beforehand, reminding them to stay strong in the face of vinegar.
The Brine Time Symphony: A Tangy Tango
Now for the magic potion: the brine! This is where the **Bread and Butter Pickles** truly earn their name. It’s a delicate dance of sweet and sour, with a chorus of spices adding depth and intrigue.
The base of our brine is vinegar. White vinegar is the classic choice, providing that sharp tang we all know and love. But don’t be afraid to experiment! Apple cider vinegar can add a slightly fruity note, while rice vinegar offers a milder, more delicate flavor. Just remember, vinegar is the boss of this operation. It’s what preserves the cucumbers and gives them that delightful pucker.
Next comes the sugar. This is what balances the vinegar and gives the **Bread and Butter Pickles** their signature sweetness. Granulated sugar is the most common choice, but you can also use brown sugar for a richer, molasses-y flavor. Maple syrup is another option, adding a touch of natural sweetness and a hint of caramel.
And finally, the spices! This is where you can really get creative and put your own spin on things. Mustard seeds, celery seeds, turmeric, and onion are the classic **Bread and Butter Pickles** spices. But don’t be afraid to experiment with other flavors. Garlic, ginger, red pepper flakes, and even a pinch of cinnamon can add a unique and delicious twist.
Slicing and Dicing: A Cucumber Chop Shop
Before we can submerge our cucumbers in the brine, we need to slice them. The key here is consistency. You want all your slices to be roughly the same thickness so they pickle evenly.
A mandoline slicer is your best friend for this task. It’s quick, easy, and ensures perfectly uniform slices every time. Just be careful, those things are sharp! I once sliced a fingernail off using a mandoline. Let’s just say it added a certain “je ne sais quoi” to the pickles that day.
If you don’t have a mandoline, a sharp knife and a steady hand will do the trick. Aim for slices that are about 1/4 inch thick. If you prefer your pickles a bit chunkier, you can cut them into spears or even leave them whole. Just remember to adjust the pickling time accordingly.
Jarring Around: A Packing Party
Now for the fun part: packing the jars! This is where we transform our sliced cucumbers and flavorful brine into beautiful jars of **Bread and Butter Pickles**.
First, make sure your jars are clean and sterilized. You can do this by boiling them in water for 10 minutes, or by running them through a hot cycle in your dishwasher. Sterilizing the jars is crucial for preventing spoilage and ensuring your pickles stay fresh for longer.
Next, pack the cucumber slices tightly into the jars, leaving about 1/2 inch of headspace at the top. You want to pack them in snugly, but not so tightly that they’re crushed. Add any spices or herbs you’re using to each jar.
Finally, pour the hot brine over the cucumbers, making sure to cover them completely. Again, leave about 1/2 inch of headspace at the top.
Sealing the Deal: A Jarring Conclusion
Once the jars are filled and sealed, it’s time to process them in a water bath canner. This is what creates a vacuum seal and ensures your pickles are shelf-stable.
If you don’t have a water bath canner, you can use a large pot with a rack in the bottom. Just make sure the jars are completely submerged in water.
Bring the water to a boil and process the jars for the amount of time specified in your recipe. The processing time will vary depending on the size of your jars and your altitude.
Once the processing time is up, carefully remove the jars from the canner and let them cool completely. As they cool, you should hear a “popping” sound as the lids seal.
And that’s it! You’ve successfully made your own **Bread and Butter Pickles**! Now all that’s left to do is wait. The pickles need at least two weeks to sit and let the flavors meld. But trust me, the wait is worth it.
Bread and Butter Pickles Recipe
This recipe makes approximately 6 pint jars.
**Ingredients: **
- 4 pounds pickling cucumbers, sliced
- 1 large onion, thinly sliced
- 1 green bell pepper, seeded and sliced
- 1 red bell pepper, seeded and sliced
- 1/4 cup kosher salt
- 4 cups white vinegar
- 3 cups granulated sugar
- 2 tablespoons mustard seeds
- 1 tablespoon celery seeds
- 1 teaspoon turmeric
- 1/2 teaspoon ground cloves
**Instructions: **
1. Combine the cucumber slices, onion, and bell peppers in a large bowl. Sprinkle with salt and toss to combine. Let stand for 2 hours, stirring occasionally.
2. Rinse the vegetables thoroughly with cold water and drain well.
3. In a large saucepan, combine the vinegar, sugar, mustard seeds, celery seeds, turmeric, and cloves. Bring to a boil over medium heat, stirring until the sugar is dissolved.
4. Add the vegetables to the saucepan and bring back to a boil. Cook for 5 minutes, stirring constantly.
5. Pack the hot pickles into sterilized jars, leaving 1/2 inch of headspace.
6. Pour the hot brine over the pickles, leaving 1/2 inch of headspace.
7. Remove air bubbles and adjust headspace if necessary.
8. Wipe jar rims clean and place lids and rings on the jars.
9. Process in a water bath canner for 10 minutes for pint jars.
10. Remove the jars from the canner and let them cool completely.
11. Check seals. Lids should be concave.
12. Store in a cool, dark place for at least 2 weeks before eating.
Beyond the Jar: Serving Suggestions for Your Bread and Butter Pickles
Okay, so you’ve got a beautiful batch of **Bread and Butter Pickles**. Now what? Well, besides eating them straight from the jar with a fork (guilty as charged!), there are plenty of other ways to enjoy these tangy treats.
- **Sandwich Superstar:** Elevate your humble sandwich with a layer of **Bread and Butter Pickles**. They add a burst of flavor and a satisfying crunch to turkey, chicken, or even veggie sandwiches.
- **Burger Buddy:** Forget boring old dill pickles. **Bread and Butter Pickles** are the perfect burger topping, adding a sweet and tangy counterpoint to the savory beef.
- **Relish Royalty:** Chop them up and add them to your favorite relish recipe. They’re especially delicious in potato salad, coleslaw, or even a simple tomato relish.
- **Charcuterie Champion:** Add a small bowl of **Bread and Butter Pickles** to your next charcuterie board. They pair perfectly with cheese, meats, and crackers.
- **Grilled Chicken or Beef Sidekick:** Serve them alongside grilled chicken or beef for a refreshing and flavorful side dish. The sweetness of the pickles balances the richness of the meat.
Troubleshooting Your Bread and Butter Pickles: Avoiding Pickle Perils
Even the most seasoned picklers can run into trouble from time to time. So, let’s take a look at some common **Bread and Butter Pickles** problems and how to solve them.
- **Soft Pickles:** The most common problem is soft pickles. This can be caused by a number of factors, including using old cucumbers, not using enough vinegar, or not processing the jars properly. To avoid soft pickles, use fresh, firm cucumbers, make sure your vinegar is at least 5% acidity, and process the jars for the correct amount of time.
- **Wrinkled Pickles:** Wrinkled pickles are usually caused by using too much sugar in the brine. The sugar draws moisture out of the cucumbers, causing them to shrivel. To avoid wrinkled pickles, reduce the amount of sugar in your recipe or add a pinch of calcium chloride (pickle crisp) to the brine.
- **Cloudy Brine:** A cloudy brine can be caused by a number of factors, including using hard water, not rinsing the vegetables thoroughly, or using spices that contain starch. To avoid a cloudy brine, use filtered water, rinse the vegetables well, and avoid using spices that contain starch.
- **Empty Jars:** This one is completely hypothetical, because how could you possibly have an empty jar of **Bread and Butter Pickles** if you followed this guide? Just kidding! Happy Pickling!
Enjoy your crunchy, sweet, tangy, homemade **Bread and Butter Pickles**! You’ve earned it.
Conclusion for Bread and Butter Pickles :
So, there you have it – your guide to crafting the ultimate homemade pickles. We covered everything from customizing the sweetness to creative uses. Making your own bread and butter pickles is simpler than you might think, and the flavor payoff is huge. With their perfect blend of sweet, tangy, and crunchy, these pickles are guaranteed to become a staple. Get ready to ditch those store-bought jars and embrace the deliciousness of homemade.
Print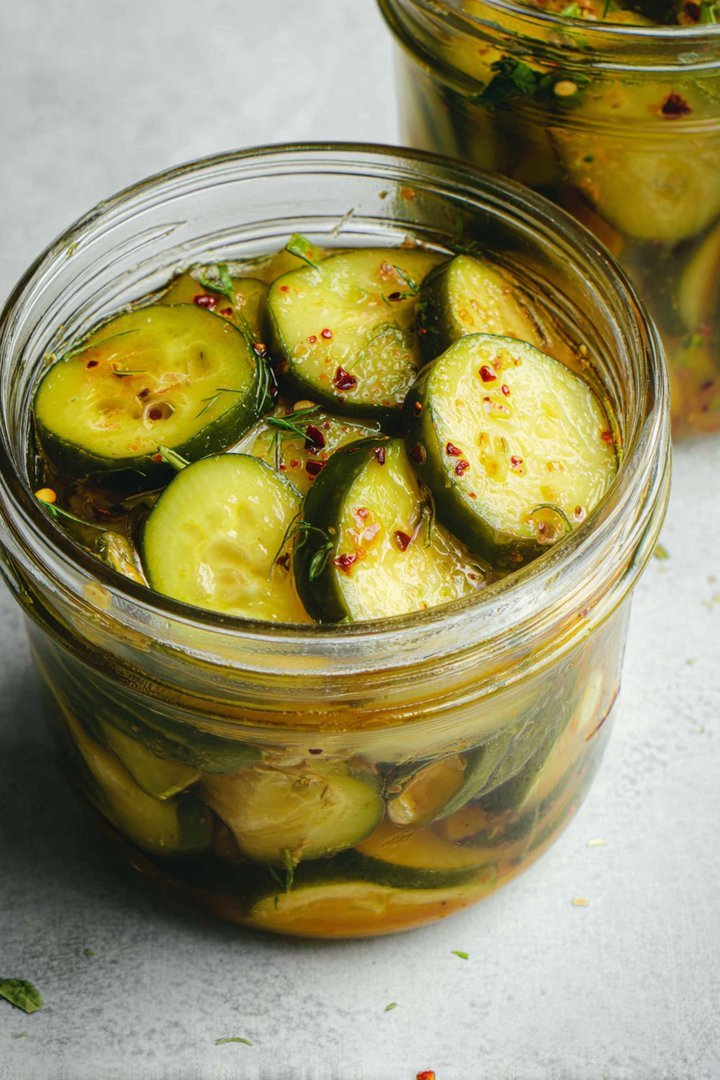
Bread and Butter Pickles
Delicious bread and butter pickles recipe with detailed instructions and nutritional information.
- Total Time: 35 minutes
- Yield: 4 servings
Ingredients
- Cucumbers (4-6 inches long): 4 pounds
- White Vinegar (5% acidity): 5 cups
- Granulated Sugar: 5 cups
- Onion, thinly sliced: 1 large
- Mustard Seeds: 2 tablespoons
- Celery Seeds: 1 tablespoon
- Turmeric Powder: 1 teaspoon
- Salt: 2 tablespoons
Instructions
- Step 1: Wash cucumbers thoroughly and slice them into 1/4-inch thick rounds. Place sliced cucumbers and sliced onions in a large bowl. Sprinkle with salt and cover with ice. Let stand for at least 4 hours, or preferably overnight, in the refrigerator.
- Step 2: Drain the cucumber and onion mixture thoroughly and rinse under cold water. Drain again, pressing gently to remove excess water.
- Step 3: In a large pot or Dutch oven, combine the vinegar, sugar, mustard seeds, celery seeds, and turmeric. Bring the mixture to a boil over medium-high heat, stirring until the sugar is completely dissolved.
- Step 4: Add the drained cucumber and onion mixture to the boiling vinegar mixture. Return to a boil, then reduce the heat and simmer for 10 minutes, stirring occasionally to ensure even cooking.
- Step 5: Using sterilized jars and lids, pack the hot pickle mixture into the jars, leaving 1/2-inch headspace. Remove any air bubbles by gently tapping the jars.
- Step 6: Process the jars in a boiling water bath for 10 minutes. After processing, turn off the heat, remove the canner lid, and let the jars sit in the hot water for 5 minutes before removing to a towel-lined surface to cool completely. Check for proper sealing after 24 hours.
Notes
- Refrigerate open jars of bread and butter pickles for optimal crispness and to maintain their sweet-tangy flavor.
- These pickles are not typically reheated, but their brine can add a unique tang when drizzled over grilled cheese or potato salad.
- Serve these homemade pickles alongside barbecue, sandwiches, or charcuterie boards for a sweet and tangy crunch.
- For a brighter, more pronounced flavor, add a pinch of ground cloves or allspice to the vinegar mixture during the simmering process.
- Prep Time: 15 minutes
- Cook Time: 20 minutes
- Method: Stovetop
- Cuisine: American
FAQs :
What makes these Bread and Butter Pickles so darn good?
Okay, let’s be real. Store-bought pickles can be… underwhelming. These homemade wonders are different! The crispness, the tang, the perfect balance of sweet and savory. It’s all about the fresh ingredients and the magic of patience. We use a blend of spices that dance on your tongue, creating a symphony of flavor. Plus, there’s something incredibly satisfying about making something delicious from scratch. Prepare to be amazed by how much better homemade tastes! You might just find yourself saying goodbye to those bland, store-bought pickles forever.
Can I adjust the sweetness level in my Bread and Butter Pickles?
Absolutely! If you prefer a tangier pickle, simply reduce the sugar slightly. Taste the brine before you add the cucumbers. If it’s too sweet for your liking, add a splash more vinegar. Remember, you can always add more sweetness, but it’s harder to take away. Experiment to find your perfect balance. Some folks even like to add a pinch of red pepper flakes for a little kick! The beauty of making your own pickles is the freedom to customize them to your exact preferences. Don’t be afraid to experiment with spices and herbs as well.
How long do Bread and Butter Pickles last, and how should I store them?
Properly sealed and refrigerated, these pickles will last for several weeks, possibly even a couple of months. However, they rarely last that long in my house! Be sure to use sterilized jars and lids when canning them. This prevents spoilage and keeps them fresh for longer. Once opened, always keep them refrigerated. Watch out for any signs of spoilage, such as cloudiness or a funky smell. If anything seems off, it’s best to err on the side of caution and toss them. But trust me, they’ll be gone long before that’s an issue.
What are some creative ways to use Bread and Butter Pickles?
Beyond just eating them straight from the jar (guilty!), these pickles are incredibly versatile. Chop them up and add them to potato salad or tuna salad for a zesty twist. They’re fantastic on burgers, sandwiches, or even as a topping for grilled chicken. Get adventurous and add them to your cheese boards for a sweet and tangy counterpoint to rich cheeses. Seriously, the possibilities are endless! You can even use the leftover pickle brine to marinate chicken or add a unique flavor to salad dressings. Don’t let a single drop go to waste!
Leave a Comment