

Imagine sinking your teeth into a symphony of savory flavors, where layers of thinly sliced meats, tangy cheeses, and crisp vegetables meld together in perfect harmony. That’s the **classic Italian sub** – a handheld masterpiece that’s more than just a sandwich; it’s an experience.
This isn’t your average lunchbox fare; we’re talking about a flavor explosion that’ll transport you straight to a bustling Italian deli, no passport required. Get ready to build your own masterpiece!
Here are a few reasons why this **Classic Italian Sub** is about to become your new go-to meal:
- Effortless to assemble, this sub is perfect for a quick lunch, a picnic, or a satisfying weeknight dinner, with minimal fuss.
- A tantalizing combination of savory meats, creamy cheese, and crisp veggies creates a symphony of textures and tastes that’s simply irresistible.
- Visually stunning, the vibrant colors and abundant fillings make this sub as appealing to the eye as it is to the palate, ensuring a delightful meal.
- Fully customizable, this recipe allows you to tailor the ingredients to your liking, making it easy to create a sandwich that perfectly suits your taste.
Ingredients for Classic Italian Sub
Here’s what you’ll need to make this delicious dish:
The full ingredients list, including measurements, is provided in the recipe card directly below.
How to Make Classic Italian Sub
Follow these simple steps to prepare this delicious dish:
Step 1: Prepare the Bread
Slice the Italian bread horizontally. Hollow out some of the bread from both the top and bottom halves to make room for the fillings. This prevents the sub from becoming too bulky.
Step 2: Layer the Meats
Begin layering the sliced turkey breast, roast beef, and chicken on the bottom half of the bread. Distribute the meats evenly to ensure a balanced flavor in every bite.
Step 3: Add the Cheeses
Next, layer the provolone cheese and fresh mozzarella over the meats. Ensure the cheese covers the meats completely, as it will melt slightly and bind the ingredients together.
Step 4: Pile on the Veggies
Add the sliced tomatoes, shredded lettuce, red onion slices, and banana peppers on top of the cheese. Distribute the vegetables evenly for a balanced crunch and flavor.
Step 5: Make the Dressing
In a small bowl, whisk together the Italian dressing, olive oil, Red grape vinegar, dried oregano, salt, and black pepper. Adjust the amounts to your liking.
Step 6: Dress and Serve
Drizzle the prepared dressing over the vegetables. Close the sub with the top half of the bread. Slice the sub into portions and serve immediately.
Enjoy your Classic Italian Sub with a side of crispy potato chips or a fresh garden salad for a complete and satisfying meal.
Perfecting the Cooking Process

To nail the perfect outcome, efficiency is key. First, assemble your ingredients. Next, thinly slice your meats and cheeses. Then, prepare your toppings. Finally, assemble the sub, and enjoy the symphony of flavors in every bite!
Add Your Touch
Feel free to get creative with your toppings! Swap out the provolone for mozzarella or pepper jack for an extra kick. Add roasted red peppers, banana peppers, or artichoke hearts for a burst of flavor. The possibilities are endless, so make it your own!
Storing & Reheating
For optimal freshness, wrap your assembled sub tightly in plastic wrap or parchment paper and store it in the refrigerator. When ready to enjoy again, take it out and let it come to room temperature for about 15 minutes. This brings out the flavors before you savor it.
Here are some tips to elevate your **Classic Italian Sub** game:
- Slice your cold cuts and cheese as thinly as possible; this creates a better mouthfeel and allows the flavors to meld together perfectly.
- Don’t skimp on the olive oil and vinegar dressing; it adds a crucial layer of moisture and tang that elevates the entire sandwich.
- Toasting the bread lightly will prevent it from getting soggy and add a delightful crunch that complements the soft fillings inside.
(Personal anecdote formated as paragraph subheading)
I remember the first time I made this for a potluck. Everyone raved about it, and it was gone in minutes! Now, it’s my go-to recipe for gatherings and casual meals.
Conclusion for Classic Italian Sub
This *classic Italian sub* isn’t just a sandwich; it’s a taste of tradition, a celebration of simple ingredients, and a testament to the power of a well-crafted meal. With layers of flavorful ingredients, a tangy homemade vinaigrette, and perfectly chosen bread, this sandwich is sure to become a new favorite. Whether you follow the recipe exactly or customize it to your liking, remember to savor each bite and enjoy the journey to sandwich perfection. Now, go forth and conquer your cravings!
Print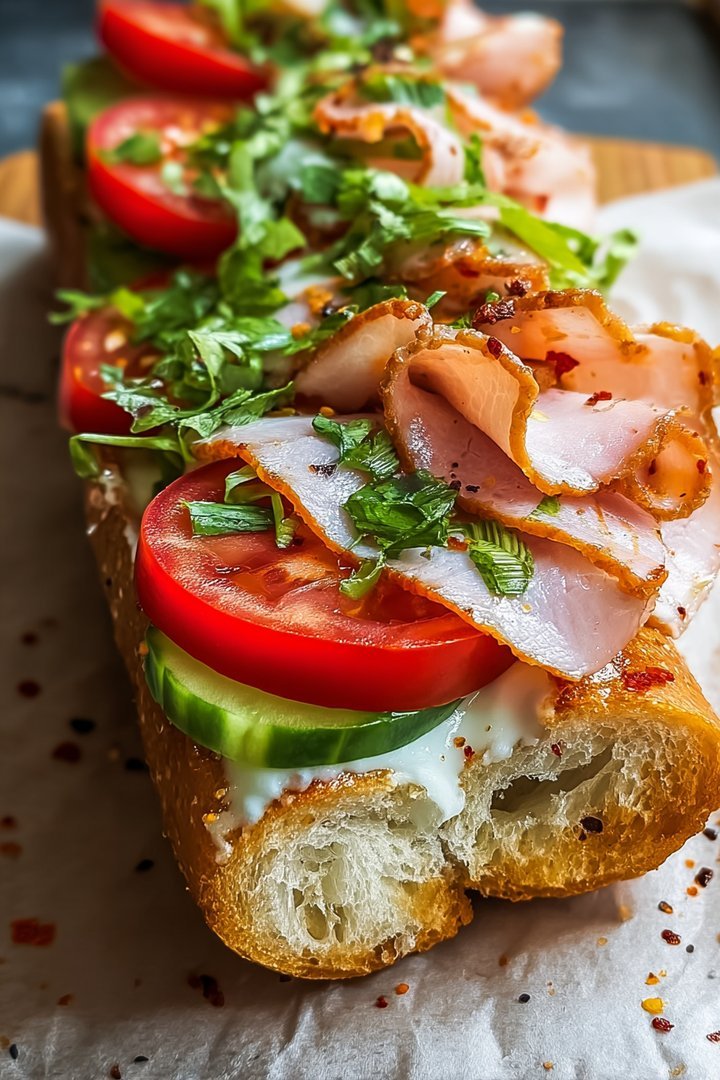
Classic Italian Sub
Delicious classic italian sub recipe with detailed instructions and nutritional information.
- Total Time: 35 minutes
- Yield: 4 servings
Ingredients
- Italian Hoagie Roll: 1 (12-inch)
- Genoa Salami: 4 ounces, thinly sliced
- Capicola: 4 ounces, thinly sliced
- Provolone Cheese: 4 ounces, thinly sliced
- Lettuce: 1/2 cup, shredded iceberg
- Tomato: 1/2, sliced
- Red Onion: 1/4, thinly sliced
- Italian Dressing: 2 tablespoons
Instructions
- Step 1: Slice the hoagie roll horizontally, being careful not to cut all the way through. Open the roll like a book.
- Step 2: Layer the provolone cheese slices along the bottom half of the roll.
- Step 3: On top of the cheese, layer the salami and capicola.
- Step 4: Add the shredded lettuce, tomato slices, and red onion slices.
- Step 5: Drizzle the Italian dressing over the vegetables and meats.
- Step 6: Close the hoagie roll and slice in half (optional). Serve immediately.
Notes
- To prevent a soggy sub, wrap it tightly in plastic wrap and store in the refrigerator for up to 24 hours before serving.
- Reheating isn't recommended, but you can lightly toast the bread halves separately if you prefer a warm sub.
- For a more authentic flavor, serve with a side of giardiniera or pepperoncini.
- Don't overload the sub with dressing – a light drizzle lets the flavors of the meats and cheeses shine.
- Prep Time: 15 minutes
- Cook Time: 20 minutes
- Method: Stovetop
- Cuisine: American
FAQs
What Makes This a *Classic Italian Sub*?
Ah, the million-dollar question! What truly elevates this sandwich to *classic Italian sub* status is the symphony of flavors. We’re talking layers of thinly sliced savory turkey breast, a kick of provolone cheese that melts in your mouth, and a vibrant medley of crisp lettuce, juicy tomatoes, and tangy onions. But the real secret? A generous drizzle of homemade vinaigrette dressing, crafted with herbs and spices, which ties everything together in perfect harmony. It’s a flavor explosion that will transport you straight to a bustling Italian deli, no passport required!
Can I Customize My *Classic Italian Sub*?
Absolutely! Think of this recipe as a fantastic foundation upon which to build your own sandwich masterpiece. Not a fan of turkey? Swap it out for chicken. Craving more heat? Add some pickled banana peppers or a sprinkle of red pepper flakes to your vinaigrette. Want extra creaminess? A smear of mayonnaise never hurt anyone (except maybe your waistline, but who’s counting?). Feel free to experiment with different cheeses, veggies, and dressings to create a *classic Italian sub* that perfectly suits your palate. Let your creativity run wild!
What Kind of Bread Works Best for this *Italian Sub*?
The bread is crucial! You need something sturdy enough to hold all those delicious fillings without falling apart, yet soft enough to sink your teeth into without dislocating your jaw. An Italian loaf, a ciabatta roll, or even a crusty baguette will work wonders. Look for a loaf with a good crumb and a slight chew. If you’re feeling ambitious, you could even bake your own! Just make sure it’s fresh and flavorful – the bread is the foundation of this *Italian sub*, so choose wisely.
How Far in Advance Can I Make This *Classic Italian Sub*?
While a freshly made *classic Italian sub* is always best, you can prep certain components ahead of time. The vinaigrette dressing can be made several days in advance and stored in the refrigerator. You can also slice your meats, cheeses, and vegetables ahead of time and keep them in separate airtight containers. However, I wouldn’t recommend assembling the entire sandwich too far in advance, as the bread can get soggy. Aim to assemble it no more than an hour or two before serving for optimal freshness and flavor.


Leave a Comment